Jadikan Phonsel Android Menjadi CCTV

1:27:00 am
Jadikan Phonsel Android Menjadi CCTV

  Mungkin kamu pernah berpikiran untuk memasang kamera Keamanan (CCTV) di rumah, kamar, toko, atau tempat  maupun lokasi penting lainnya. Akan tetapi kamu tidak memiliki cukup budget untuk membeli sekaligus memasang CCTV,? mengingat harganya yang memang tergolong mahal.
 Tenang,  jangan bersedih dulu, ada alternatif lain kok yang pastinya tidak menguras dompet kamu.
Apasih alternatif lain itu??
Smartphone Android 
Ya, Phonsel pintar kamu bisa berubah menjadi CCTV loh..


Bagaimana caranya?
Simak sampai kelar :v
    Kamu bisa memanfaatkan smartphone Android lama yang sudah kamu anggurin.
Bila tidak ada, agan juga bisa membeli smartphone Android murah atau bekas. Yang penting punya kamera belakang setidaknya 5MP atau lebih supaya gambar yang di ambil bisa lebih jelas .
   Metode yang akan kita gunakan cukup sederhana dan sangat mudah. Kita akan menggunakan aplikasi IP Webcam yang bisa kamu download di Play Store atau lainnya, yang bakal menyulap smartphone Agan menjadi kamera CCTV.
Jadikan Phonsel Android Menjadi CCTV
IP Webcam 
Apps  Productivity   Appliqato
DOWNLOAD
  • Berikut caranya:

  •     Install aplikasi IP Webcam di Google Play Store Atau apps store lain. Dengan aplikasi ini kita bisa melakukan streaming video, yang ditangkap oleh kamera smartphone Kita tadi. Aplikasi IP Webcam ini tersedia dalam dua pilihan, gratis dan ada juga yang berbayar. Kita bisa install yang gratis dulu, kalau memuaskan tinggal upgrade untuk mendapatkan fitur-fitur lebih banyak.

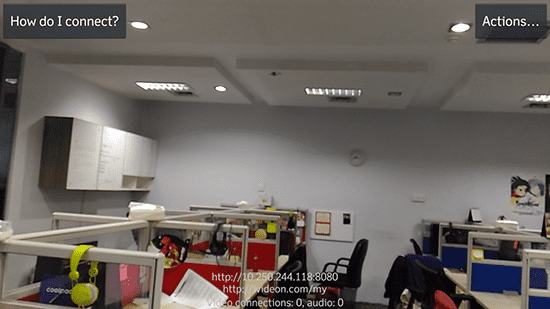
  •    Selanjutnya buka aplikasi, Agan bisa mengatur preferensi video, efek, dan beberapa aspek lain dari video yang akan ditampilkan. Kemudian lakukan pendaftaran dan login agar agan bisa menampilkan siaran dari kamera smartphone tadi, 

  tekan tombol Start Server untuk memulainya. Untuk melihat di browser ada beberapa informasi seperti alamat IP agar Agan bisa melakukan streaming.

Screenshot_2016-06-30-08-18-23
  •   Langkah terakhir letakkan smartphone Agan di tempat yang Agan tuju, kondisikan baterai smartphone Agan, karena bisa cepat habis. Agan bisa sambil charger smartphone Agan setiap saat di saat menggunakan fitur ini.
    ip webcam
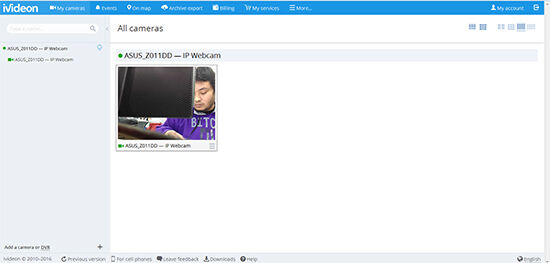
  •   Untuk melihat tampilan CCTV, buka http://ivideon.com. Selanjutnya login atau download aplikasi ivideon di Google Play Store.
Pastikan smartphone lama Kamu yang menjadi CCTV terkoneksi dengan internet.

TERIMAKASIH ATAS KUNJUNGAN NYA

Tertarik ingin mencoba?


How to install the Plugin on Wordpress

5:22:00 pm
Kangentot - How to install the Plugin on Wordpress. I created this article because many of my customers don't know how to install plugins on wordpress. What is a plugin? From what I read from wordpress, the plugin is an application to add functionality that already exists in the WordPress CMS.

WordPress itself is designed slim and lightweight, to maximize flexibility and minimize code. Well this plugin then offers custom functions and features so that each user can customize their site with their specific needs.

How to install the Plugin on Wordpress

The original function of the wordpress CMS itself is as a CMS that allows users to install blogs on their own hosting. In accordance with existing developments, wordpress functions change as a website that can maximize the needs of each person itself.

For example, as a forum using the BBPress plugin, online shopping using the Woo commerce plugin, news website, social network using the Buddypress plugin and many other big website websites that use this CMS.

With wordpress CMS you can create any website than you can imagine. For how to install the plugin on wordpress itself there are many ways, install manually by first downloading the file and installing it directly without first having to download the file.

Usually if you buy a premium plugin then you must first download the file where you bought the plugin. Here are the steps to install the wordpress plugin manually:

1. Please first download the file where you bought or downloaded the plugin. Addition: Usually the downloaded file is in the form of a download package and you are required to extract it but there is also a plugin that you download only in the form of a plugin without you having to extract and you can directly install it.

2. After you download the file, please enter your wordpress dashboard. Then enter the Plugins menu -> Add New

How to install the Plugin on Wordpress

3. Then after being turned down there is an Upload Plugin button, please click the button

Upload plugin on  wordpress

4. After that you click Browse and you upload the zip file from the plugin that you downloaded after that click Install Now.

browse and upload plugin on wordpress

5. Wait until the upload process is complete. After the process is complete that you need just click the Activate Plugin link.

activate plugin wordpress

6. Finish, you just have to set the plugin.

The above method is how to install the manual plugin, then how to install automatically without having to upload the download and upload the plugin. This method can only install plugins that only exist on the wordpress repository itself. So you can't use the Premium plugin or free plugin outside the wordpress.org repository itself.

Here are the steps.

1. After you download the file, please enter your wordpress dashboard. Then enter the Plugins menu -> Add New

How to install the Plugin on Wordpress

2. After that you just have to find the plugin needed, for example here I will install the wp editor plugin. Then you search the keyword wp editor then click enter on your keyboard.

search plugin via dashboard wordpress

From the picture above like we want to install the wp editor plugin that has a pencil drawing. Then we just click the Install Now button on the plugin box.

3. Wait until the upload process is complete. After the process is complete that you need just click the Activate Plugin link.

4. Done, you just have to set the plugin.

Another way is to upload directly on the server or it can also be via FTP (File Transfer protocol). I will explain this a little. If you experience problems in both ways above, make sure you first contact your hosting. If forced you can install the plugin via upload directly on your server or via FTP. For FTP, I usually use filezilla, you can download it at https://filezilla-project.org/

Here are the steps:

1. Download your plugin, please extract the file that you downloaded earlier.

2. Please log in first on your server or on your FTP. For this problem, please contact each server.

3. Then please upload the extracted file in the wordpress /wp-content/plugins/folder.

Activate manual plugin wordpress

4. After you have finished uploading the file, please enter your wordpress dashboard, then enter the Plugins menu -> Installed Plugins. Then click Activate on the name of the plugin you have uploaded.

5. Done, you just have to set the plugin.

Note: Don't use too many plugins because it will burden the server.

Troubleshouting when installing the plugin:

Trouble: If you experience a case like this:
Unpacking the package ...
Installing the plugin ...
Destination folder already exists.

Solve: Please check the zip file first, whether it's a plugin, theme or other zip file that is not a plugin. If it's not a plugin, please extract the file first, chances are it is a download package that requires you to extract the file you downloaded first and then upload the zip file after you extract the file. If it's still the same, please ask the author plugin. :)

Cara mempercantik tampilan phonsel dengan widget kreasi sendiri

10:49:00 pm


Cara mempercantik tampilan phonsel dengan widget kreasi sendiri
     yups, menariknya kita tidak lagi bosan dengan tampilan widget yang pada umumnya hanya begitu-begitu saja.
    Sebab, kita bisa mengkreasikanya sendiri seperti apa widget yang kita ingin kan, kita bisa mengkombinasikanya dengan photo, text dan lain sebaigai nya

     bagaimana caranya?
    Simak ulasan berikut
     chekidot!!..
     BAHAN & LANGKAH² 
    1.  ZooperWidget

    Ya, ZooperWidget adalah salah satu aplikasi di antara berbagai apk pembuat widget di phonsel android
    Rekomended yang versi Pro supaya tidak ada iklan yang mengganggu konsentrasi kita saat mengoperasikan nya. Untuk versi biasa bisa anda cari  di play store atau apps store yang lain
      2.Setelah meng-install  ZooperWidget Pro tekan dan tahan layar beranda anda dan pilih widget
      Pilih widGet
      3. Scroll ke bawah hingga menemui ZooperWidget Pro lalu pilih klik  dan tahan dengan menggesernya menuju layar beranda
      4. Ketuk hasil ZooperWidget Pro  yang telah di bawa ke layar beranda untuk di eksekusi
      • Di situ akan di sajikan 4 menu pilihan
      1. Empty
      Di sini kalian bisa membuat dari nol (awal)
      2. Builtin
      Di sini kalian bisa memakai atau meng edit template yang sudah di sediakan oleh aplikasi ZooperWidget Pro 
      3. SD Card 
      Disini bisa kalian gunakan apabila kalian sudah menyimpan template ZooperWidget Pro di SD card kalian, kalian juga bisa meng edit sesuai dengan yang kalian ingin kan
      4. Auto Save
      Disini kalian bisa menggunakan template yang pernah kalian buat
      • Berkreasi di dalam menu layout
      Seterus nya silahkan untuk meng-oprasi kan nya sendiri 
      Bisa dengan menambah teks, jam, tanggal, lokasi, batrai, image dsb
      Selamat mencoba guys...
      Apa bila ada yang kurang jelas bisa di pertanyakan di kolom komentar


      Easy way to edit blogger templates

      10:09:00 am
      Kangentot - Easy way to edit blogger templates. In a website, template, theme, style or skin is very important, besides that the website will look more professional. Not only that, a website that has a simple but professional template will be a separate binding for visitors to the website. For this reason, it is necessary to edit the blog template to make it look more attractive.

      Easy way to edit blogger templates

      Ok buddy, now I will discuss a little how to edit blogger templates or blogspot in a way that is quite easy and of course safe.

      Before you need to do is first backup your blogger template or blogspot. For backup tutorials can be seen at:


      Ok after you backup your original template, here are easy steps how to edit blogger or blogspot templates:

      1. Please go to TEMPLATE / THEME

      Easy way to edit blogger templates

      2. After that, click EDIT below the preview image of your template.

      Easy way to edit blogger templates

      3. Now you can just edit the blogger code from the template you installed, it's easy right?

      4. If you want to search for a specific code such as the .post code then you simply press the CTRL+F button on your keyword, then there will automatically be a search input in the upper right of the editor , before you click the editor first, after that you just write the keyword .post and click enter on your keyboard. See sample images below:
      Easy way to edit blogger templates

      5. After you press enter you will be taken to the keyword. Usually there are some keywords that are highlight with these keywords, just search for what you want to replace with you. See sample images below:

      Easy way to edit blogger templates


      Isn't it easy to edit the blogger template or blogspot above?

      Easy way to backup blogger templates

      9:15:00 am
      Kangentot - Easy way to backup blogger templates. Backing up blogger templates (Themes) is very important to be known by novice bloggers before editing. Because to avoid errors in editing your blogger or blogspot template, if an error occurs in editing the code then you can restore the template to the original.

      Easy way to backup blogger templates

      Ok buddy, although this knowledge is simple but very important. Here's how to easily back up blogger or blogspot templates:

      1. Please go to the TEMPLATE or THEME

      Easy way to backup blogger templates

      2. Click the button BACK UP/ RESTORE to the right of your screen:
      Cara mudah backup template blogger atau blogspot 2

      3. Then a pop up will appear. Then click DOWNLOAD COMPLETE TEMPLATE

      Easy way to backup blogger templates

      4. Then download and save your xml template file on the computer.
      5. Remember the folder where your template is stored or copy the file into a flash disk or secure folder on your computer.

      Then how to restore the template that you previously backed up?

      This is very easy:
      1. Click the BACKUP / RESTORE button as in the tutorial above.
      2. After that a pop up will appear as shown above, just click Browse on the pop up, then click upload.
      3. After clicking upload, just wait until the upload process is successful.


      If you already know how to back up templates and restore them, we can edit the template as we want, either changing the template structure, adding widgets, changing css or javascript, and more.

      Modify Blogger Blog Post's Permalink (With Date) The Right Way

      1:05:00 am
      Kangentot - Modify Blogger Blog Post's Permalink (With Date) The Right Way. Ask any WordPress blogger, what's the best thing that he's enjoying in "WordPress" software.

      He'd say: Freedom to change Permalinks.

      Yeah, maybe he's right.

      We can't change the format of permalinks.

      But...we can change the permalinks and dates in them, too! How? Keep reading!

      Modify Blogger Blog Post's Permalink (With Date) The Right Way

      What Do You Mean By 'The Right Way'?

      The right way, because here I'm not just going to tell you that how can you change permalink, but also that how you're going to redirect your old post URL to the new one permanently (301).

      Benefits?
      • Biggest advantage: Backlinks will still work. When you permanently redirect a page to another, the link equity or say the link juice gets transferred. So, if you'd some backlinks, they'll still help you to rank.
      • No, loss of rank: If your blog post is ranking, you would think that if you would change URL of the blog post, then the ones who are coming from Google would be lost and it would hurt your SEO.
        Nope. Because we're redirecting the old URL permanently, your Google visitors would still be able to reach your blog post.
      Note: After a week (or 3-4 days) your previous URL will get de-indexed by Google and your new URL will get indexed and will be in its earlier position (you'll have to have patience.)

      FAQ:
      1. Why change permalinks?
      A: Sometimes we have to change post titles and to keep permalink and post title's meaning synced, changing permalink will be beneficial.
      2. Why modify the date?
      A. To keep evergreen blog posts look evergreen in SERPs. :)

      How To Do This?

      Okay so let's suppose that you have a blog post and its URL is this:
      http://www.bloggerguider.com/2015/08/how-to-create-ready-to-edit-text-or.html

      And you want to change it to this URL:
      http://www.bloggerguider.com/2017/01/how-to-create-ready-to-edit-text-table.html
      Now, the first step to start this process is reverting the blog post into a draft, and you can easily do this by clicking the button "Revert to Draft".

      revert to draft
      changing permalink
      • Okay, now you can click the "Permalink" option in the "Post Settings" (right) and you'd see that now you can now edit the permalink.
      • Firstly, note down the current Permalink of the blog post.
      • Then change the permalink words.
      • To modify year and month in the permalink, just click on "Schedule" option and choose the date according to your needs and instead of clicking the "Publish" button, press "Save" button.
      • Refresh the page.
      • Again click on that Permalink button.
        At this point, you'll notice that the year and month numbers have been changed in the Permalink.
      • Not publish the blog.
      Congratulations. =)

      You've changed the permalink of your blog post.

      Redirecting Older Post URL To New

      This one is an important part of this process, so be sure not to skip it.

      To redirect, we're going to use Blogger's own "Custom Redirects" feature which you may first under Search Preference in settings.

      Steps are simple, and here they're:
      • Go to Settings > Search Preferences > Errors and redirections > Custom Redirects
      • Click on "Edit."
      • Click on "New Redirect."
      • You'll be given two text fields.
      • In the first one, enter the previous permalink (without domain)
      • Check the "Permanent" option.
      • And in the second one, enter the new permalink.
      Congratulations again! =)

      By the way, maybe, you'd love this too: Enable HTTPS in Custom Domain Blogger Blog [Officially]

      How To Check If It's Really Permanently Redirecting And Status Code is 301?

      • Go to https://httpstatus.io/;
      • Enter the blog post's old URL;
      • You'll receive something like the following results:
      How To Check If It's Really Permanently Redirecting And Status Code is 301?
      And so, you've successfully changed the permalink with dates! :)

      Final Words

      I hope you've liked this blog post. I know, Kangentot has been updated after almost two months, but because of studies, I rarely get time to write and explore new things but I'll try to update it as fast as possible. And as always, don't forget to share, comment and subscribe! Thanks!

      What makes a blog, a Brilliant and Converting spot?

      12:50:00 am
      What makes a blog, a Brilliant and Converting spot?

      The internet has been growing exponentially, with the number of websites currently running online.
      This growth is only expected to increase with CMS platforms like WordPress and Joomla, and AI platforms like Wix making web designing simple and affordable.

      So if you have an idea or a niche for a blog, now is probably the best time to launch it. But launching your website isn’t the easy job.

      How do you ensure it draws in visitors and actually becomes profitable?

      There are quite a few methods, but in this post, we are going to focus on the most important one, the content.

      Now we're gonna talk about content on differents parts of a website/blog:

      A Killer Landing Page

      landing page

      The trend of landing pages is increasing day by day and why not, it's really a great technique to showcase to your visitors, what your blog is offering and what type of content they can expect from your blog.

      Most blog owners focus on making their landing page colourful, attractive and graphical, which is a good thing.

      But an image might not accurately describe what your website is trying to convey, and even if it does, it's an excellent idea to get a catchy tagline and a concise but compelling description posted on the landing page. It will definitely get your visitor to stay and look around your blog.

      The About Us Page

      The ‘About Us’ page is a page, we all know, that describes either the author of a blog or the team that works for the company whose blog it is. A well-written bio for the author or the team inspires confidence, and for a business looking to provide service through their blog, this is essential.

      Any client looking for representation or a service will want to know the team they are going to work with before approaching the company, and the about us page handles this.

      So when this About Us page is such a crucial part of your blog and your success, you can't just leave it with some bugged content.

      If you ensure that you've put great information, written in a friendly tone, an easy and local language, it can indeed result in increased number of your visitors and convert them into your customers.

      Tone and Flow

      Your blog is the window to your business, and it is the content on the website that paints the image.

      You need to decide if the general tone of all articles and short descriptions on your website are going to be strictly professional, fun and quirky or maybe sarcastic and arrogant.

      Each style works depending on the blog’s niche or the company. But the key is to maintain this tonality throughout the blog. It is a perfect idea to hire professional content writers from websites like contentmart.com, for all the content on the blog (if the primary motive of the blog is to increase sales). They are aware and trained to deliver as per the requirements.

      Accuracy in Every Service Description

      Do not exaggerate or be vague in any part of your blog, may it be the inspiration for your blog’s niche or the description of service your company provides.

      Your visitors will convert to subscribers and clients believing the content, and if it turns out to be wrong or misleading, it will prove really disastrous. It can result in an entirely dead blog, where no one is interested in engaging with the content, with the owner and with the company.

      Attention to Detail

      Finally, it is imperative to ensure all content on your blog, from the smallest bio to the longest blog article, is grammatically immaculate and eloquent.

      Nothing says “unprofessional, immature and unreliable” more than grammatical errors.

      You do not want your visitors to believe the brains behind the blog, or the company is illiterate or careless.

      Professional content writers are well versed in these techniques, and it is often a good idea to hand over the content work to these guys. You can hire content writers online, on platforms like ContentMart.

      What makes a blog, a Brilliant and Converting spot?

      Final Words

      There are more things that needs to be done, for example, the design of the blog. But, one can easily find a beautiful template or theme for their blog and that's why we didn't talk much regarding design. I hope you liked the blog post. If you have any other ideas that you'd like to be added in this blog post, then be sure to put them in the comment section below. Thank you!

      What does "dofollow" actually mean? Firstly, does it have a meaning?

      12:28:00 am
      What does "dofollow" actually mean? Firstly, does it have a meaning?
      You Know What? I Don't Want a rel='dofollow' Backlink.
      ---

      Who doesn't want backlinks?

      If you're a blogger, then yes, you want them.

      Dofollow?

      Then, of course. You'd crave for them.

      But what if I tell you I don't want them?

      It's not that they're not important for me.

      But you know what, the real thing is there nothing like a "dofollow" backlink.

      See, we use "rel" (which is, relationship") to declare the relationship or value of a link.

      I see bloggers these days, publishing articles like "Get 20 Dofollow Backlinks For These 20 High PR Sites". Wait, really?

      According to w3schools.com, there's nothing like a "dofollow" link. Yes, there's something called "nofollow" rel value, but no mention of "dofollow" value. You know why?

      BECAUSE SIMPLY, IT DOESN"T EXIST.

      And we're blindly using this syntax for linking sites:
      [code]<a href='#' rel='dofollow'/>[/code]

      We need to simply stop using it, and whenever any person asks for it, we need to tell him the reality. :)

      By the way, we call non-nofollow links, links. Just links.

      Something More

      Yep, this blog post is not going to end here.

      Let's discuss the rel values that you can use in your blog.

      rel='prev' or rel='next': Why use them?

      See, not many blogs currently are using series. I mean, posting posts in parts, like part 1, part 2 and then part 3.

      But still, for the ones that are doing so, you guys can use these two rel values to give your viewers or visitors, a better experience.

      By the way, some people believe that these rel values are somehow related to reducing duplicate content.

      Nope.

      Now, it helps Google to show the first page of the series in the search result. See this excerpt from Google own blogspot blog post.
      Hint to Google the relationship between the component URLs of your series with rel=”next” and rel=”prev”. This helps us more accurately index your content and serve to users the most relevant page (commonly the first page).
      So, that's what it does. :)
      And yes, you need to put it inside the <head> section.

      rel='noreferrer': Why use them?

      You can use it when you don't want to send any HTTP referer header.

      See, affiliate sites send an HTTP referer header to track the purchase done by the customer.

      If you use this "noreferrer" rel value, they won't be able to fetch or track the customer, and you won't get paid the purchase done by the customer.

      And it's not related to SEO in any way. But nofollow does.

      rel='nofollow': Why use them? And when?

      There are many scripts on the internet, by which you can mark all your link, "nofollow."

      By mark I mean, putting "rel='nofollow'" in every hyperlink your site has.

      But what does this nofollow tag do?

      It destroys all SEO related benefits being given to that link because of the presence of it in a high PR page.

      See, Google uses backlinks as a ranking signal.

      The more backlinks from high PR sites, or high authority sites you have, the more it'll affect your site, SEO wisely.

      But it won't at all affect your site due to that backlink if the backlink has "rel='nofollow'."

      It simply gives the message to Google bots to ignore that link.

      By the way, maybe, you'd love this too: Enable HTTPS in Custom Domain Blogger Blog [Officially]

      So if you've got a link from a high authority site, but it does have a "nofollow" rel value, then, my friend, you're not going to get any SEO related benefit.

      But they're not always bad because they might help you get some traffic.

      and, you need not to use JavaScripts that automatically put "rel='nofollow'" in all the links. Just use them, when you feel that the site you're linking doesn't have "quality." Linking to spammy sites, can down your SEO meter.

      ...and

      Hope you liked the blog post. You, maybe, knew this thing already but it's important for newbies because there always thousands of posts on internet which are spreading this word: "dofollow", like it actually exists. Thanks!

      Enable HTTPS in Custom Domain Blogger Blog [Officially]

      12:02:00 am
      KANGENTOT - Enable HTTPS in Custom Domain Blogger Blog [Officially]. That's true, and I'm really excited to inform you that you can enable SSL in your blogger blog that has a custom domain set. :)

      From the past few days, people were finding ways to get HTTPS on their blogs with a custom domain, and today I got the news that the feature is live on the beta version of blogger.com, that is, draft.blogger.com.

      So without wasting any time, let's start.

      Enable HTTPS in Custom Domain Blogger Blog [Officially]

      This is in beta for now. So...

      There are redirection issues for now.

      Non-www to www redirection is not working for now.

      Other redirections are working.

      For example, http://www.example.com to https://www.example.com is working.
      But https://example.com to https://www.example.com is not working.
      And http://example.com to https://www.example.com is not working.

      You know more about your blog than me. So if you think you're good to go without these redirections, proceed and if not, please wait.

      Thanks to John Ralf for mentioning this. :)

      How to enable the feature?

      By default, it's not available in Blogger's dashboard. You'll have to enable it from draft.blogger.com. For that, follow these simple steps.
      • Open draft.blogger.com
      • Go to Settings > Basic Settings
      • You'll find this:
      Enable HTTPS in Custom Domain Blogger Blog [Officially]
      • It'll be turned off, or "NO" by default, so turn it ON.
      It's not necessary, but now you can come back to blogger.com (default version of Blogger), and you'll now find this option there too.

      Now the next step is to wait for 10-20 minutes until HTTPS is processed for your blog. For those 10-20 minutes, the redirection option would be like this:

      Enable HTTPS in Custom Domain Blogger Blog [Officially]

      Simply, not available.

      But after 20 minutes or maybe 30, this option will become available and once it becomes, turn it ON, or to "Yes."

      You're now good to go!

      What are the problems that I'm going to face now?

      The most significant problem will be Mixed content.
      mixed content
      Image credits: SSLtobuy.com
      Which is, when you have SSL certificate in your host for your blog/website, or in other words, you have HTTPS in your blog, you can link to or load files from a non-SSL certified host.

      For example, if I have HTTPS on my blog, then I can't load files from URLs like "http://bla.com" because they are not secured and so, will make my blog unsafe too.

      That's what mixed content is, and you'll have to remove all such external files to be able to see a green lock at the left side of the address bar of any browser (if there is any unsafe content, then there will be a yellow lock at the left side of the address bar of any browser).

      I already have HTTPS on my blog, because I'd used your guide earlier

      If you don't already know, I had found a way to get HTTPS in any blogger blog, using CloudFlare.

      Well, I'd say, if you use CloudFlare just for HTTPS, then remove CloudFlare.

      For doing that, just change your nameservers to the default ones.

      And undo the steps mentioned in this guide.

      Because there's nothing better than official SSL. Cloudflare's free SSL has some restrictions too, so it's better to not use it when there's a better option available and that also for free.

      By the way: If you need any help in removing Cloudflare, don't hesitate to contact me (contact@shivanshverma.com), I'd help for free, won't ask you a dollar for this.

      And to get the default nameservers just go to YouTube and search for how to change nameservers of <your domain provider> and just see what they were before the YouTubers changed the nameservers.

      Questions You've In Your Mind:

      #1 | What about Google Search Console? What property should I add and what property should I remove?

      Answer: You need to remove http://www.blogurl.com and add https://www.blogurl.com. And then, submit sitemap from the new property. 
      How to delete a property? Just click on the "Manage Property" button that's present on the homepage of GSC and click "Delete Property."

      You can Google if you want to know basic stuff about GSC, like how to add a new property or how to submit a sitemap.

      #2 | In the previous method, in which we had to do stuff using Cloudflare, you'd told to not use sitemap or submit it. Why not?

      That's because, as it's now officially supported by Blogger, they've changed URLs in the sitemap to https://www.blogurl.com from http://www.blogurl.com. Earlier, we could not, because we could not edit sitemap's content or change the way the URLs are present there.

      #3 | Is it safe?

      Just don't forget to turn ON "HTTPS Redirect" and fix the "Mixed Content" issue. Everything will be safe then.

      #4 | I want to change all my URLs in my menus of my blog's pages from HTTP to https. What should I do to fastly change them?

      Don't use JavaScript by the way. Just copy all your template's code to notepad and replace every occurrence of http://www.blogurl.com to https://www.blogurl.com. It'll be done in seconds.
      And for the URLs in widgets, try doing it manually. It'll just take 10 minutes maximum.

      #5 | "HTTPS being processed" is appearing for more than a day now. What to do?

      Turn OFF "HTTPS availability" and turn it back ON and then see if the issue resolves.

      More questions? Add them in the comments. I'll try my best to answer them. :)

      From the editor

      That was a big relief - for sure for bloggers. Thank you, Blogger team for https for all of the blogger blogs for free. Now guys, just secure your blog and pass the mixed content barrier and you're good to go and achieve the benefits of SSL on your blog! Thanks!

      How do I get rid of Promotional emails (make them disappear)

      11:47:00 pm
      How to avoid seeing any Promotional Emails in Gmail
      How to avoid seeing any Promotional Emails in Gmail
      If you're a person who is always online, surfing sites reading content, downloading ebooks, you must have entered your email several times on several websites.

      Well, you know, that's a trap.

      These websites start sending you emails about there new products and these people are marketers and know how to manipulate one's mind.

      Well, what is the solution for all this?

      I'd say, to get rid of such emails.

      You'll say, "that's why the promotional emails tab is present in Gmail."

      Amm, but still they'll be in your inbox, and you still would have the wish to see those email once. Because the language and the words used in such emails are powerful.

      So? How to avoid such emails? How to just completely remove them from the inbox?

      And by the way, where these emails will go then?

      Hold on, read the blog post and you'll know everything.

      THE PROCEDURE

      Okay. So, the main thing.

      We are going to do this using "Inbox."

      You don't know what Inbox is? It's just a new way to use Gmail. It's like Google Chrome & Chrome canary. Having slightly different features but backed by the same organization.

      Okay. So here are the steps:
      • Head over to Inbox;
      • From the left menu, see for "Promo" label;
      • Hover over it and click the clog (gear) icon;
      • And switch off the "Bundle messages in the inbox" option.
      avoid seeing promotional emails in gmail

      Switch off the switch that in front of "Bundle messages in the inbox."
      • And then check the "Skip the inbox" option too (after you check it, you'll have an option to move previous promotional emails also
      • That's all. :)
      Easy. Right?

      Where will the promotional emails go?

      In "Archive" folder in Gmail and in "Done" label in Inbox.

      And by the way, it will work everywhere. No matter you're on Gmail app, Inbox app, Gmail web version or Inbox's.

      And 

      Now close the tab, go to Gmail and congrats. :)